CLIPを実装し理解する

目的
- CLIPを理解するため、公式実装や他の記事を参考にしながらCLIPを自分で実装してみました。
- 公式実装では他に様々な工夫がなされていますが、今回は最低限のコードでCLIPを分かり易く実装することを目的にしているため、性能については保証できません。
- 本記事はCLIPの実装と解説を主な目的としているため、論文の詳しい解説に関しては他の記事を参照してください。
- 自身で実装したモデルについて、学習は行っておりません。
CLIPとは
CLIP(Contrastive Language-Image Pre-Training)は、Learning Transferable Visual Models From Natural Language SupervisionにおいてOpenAIが発表した画像分類モデルの事前学習手法です。 CLIPでは、従来のようなラベル付き画像データセットを用いた教師あり学習ではなく、大量の画像とテキストのペアデータセットを用いて画像分類器を学習させています。この学習方法では、従来とは異なりデータセットに含まれるラベルの種類が限定されないため、幅広い種類の画像に対しての分類能力を得ることができます。その結果、初めて見るデータセットに関しても高い分類性能を示し、zero-shot性能が非常に高いモデルを作成することができます。
実装解説
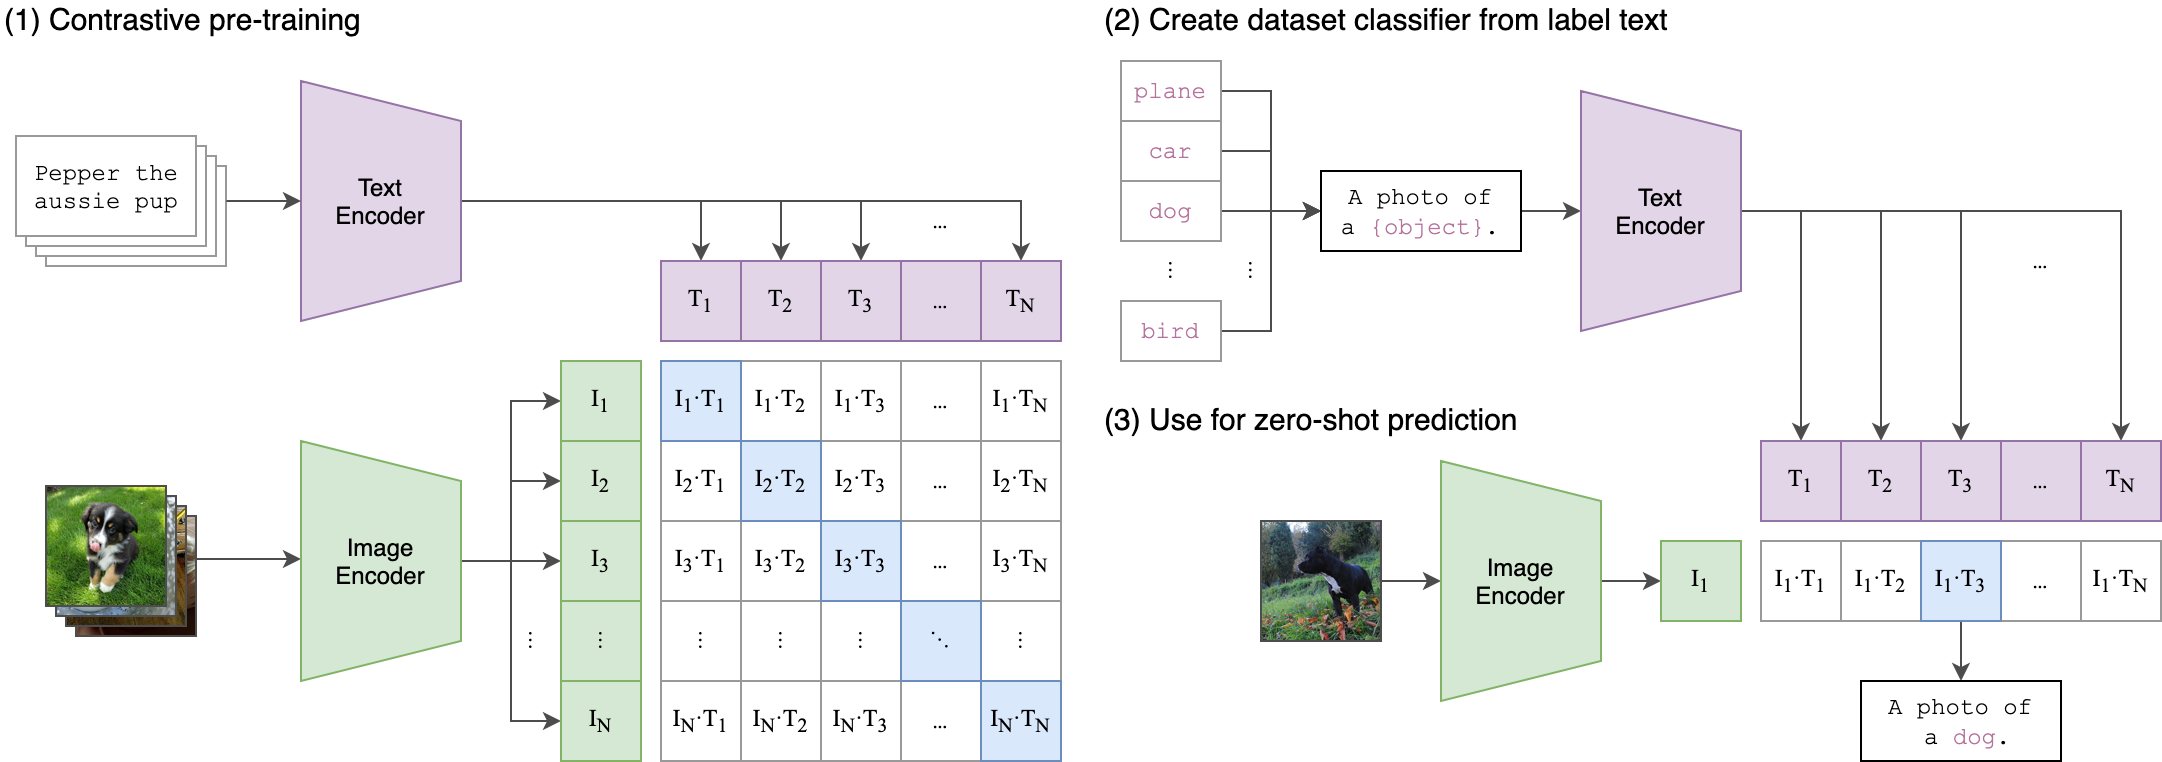
1. CLIPの全体的なアーキテクチャについて
CLIPのアーキテクチャは以下の通りです。
CLIPは大きく画像をEmbeddingするImage Encoderと、文章をEmbeddingするText Encoderから構成されています。
Embeddingとは、自然言語を計算が可能な形、すなわちベクトル表現に変換することを言います。CLIPのImage EncoderやText Encoderでは、1つの画像や文章をそれぞれ512次元のベクトルに変換しています。
Embeddingの詳しい説明に関してはこちらを参考にしてください。
2. Text Encoder
CLIPのTextEncoderとしては、TransformerのEncoderが用いられています。
Transformerは自然言語処理では必須のモデルで、全体として以下のようなアーキテクチャを持つモデルです。
TransformerのEncoderでは、次のように入力テキストの処理が行われます。
- トークン化された入力文章をEmbeddingする。
- Positional Encodingを1でのEmbeddingに足し合わせることで文章中での位置情報を付与する。
- MultiHeadAttention層とFeedForward層、これら層の後にそれぞれ続くResidual層+LayerNorm層の計4層からなるEncoderBlockに2での出力が渡され、順に処理が行われる。
- EncoderBlockでの処理がN回繰り返される。
各層の詳しい処理の説明はここでは割愛します。参考文献にある記事に詳しく説明がなされているのでそちらを参考にしてください。

TransformerのEncoderBlockの実装は次のようになります。
ただし、CLIP内のTransformerのEncoderBlockでは、元のTransformerのものと異なり、LayerNormalizationをMultiHeadAttentionやFeedForwardNetwork層の後(=Post-Norm)ではなく前(=Pre-Norm)で行っています。 (参考:Pre-Normを採用する理由)
class TransformerEncoderBlock(nn.Module):
    def __init__(
        self,
        width: int,
        heads: int,
        attn_mask: torch.Tensor = None
        ) -> None:
        super().__init__()

        self.multi_head_attention = nn.MultiheadAttention(width, heads)
        self.layer_norm_1 = nn.LayerNorm(width)

        self.ffn = nn.Sequential(
            nn.Linear(width, width * 4),
            nn.GELU(),
            nn.Linear(width * 4, width)
        )
        self.layer_norm_2 = nn.LayerNorm(width)
        self.attn_mask = attn_mask

    def forward(self, x: torch.Tensor):
        # Layer正規化した後にMultiHeadAttentionに入力し、その出力と元の値を足し合わせる
        x = x + self.multi_head_attention(
            self.layer_norm_1(x),
            self.layer_norm_1(x),
            self.layer_norm_1(x),
            self.attn_mask)[0]
        # Layerした後にFeedForwardNetworkに入力し、その出力と元の値を足し合わせる
        x = x + self.ffn(
            self.layer_norm_2(x)
            ) # LayerNorm->FeedForwardNetwork->Add
        return x
TransformerのEncoderは、上で定義したTransformerEncoderBlockを用いて以下のように実装できます。ただし、オリジナルのTransformerでは、Positional Encodingはsin関数やcos関数を用いていますが、実装では0~1の一様分布からランダムに選択した値を持つ学習可能なパラメータとなっています。
class TransformerEncoder(nn.Module):

    def __init__(
        self,
        context_length: int,
        vocab_size: int,
        width: int,
        layers: int,
        heads: int,
        attn_mask: torch.Tensor=None
        ) -> None:
        super().__init__()
        self.token_embedding = nn.Embedding(vocab_size, width)
        self.positional_embedding = nn.Parameter(torch.randn(context_length, width))
        self.width = width
        self.n_layers = layers
        self.transformer_encoder_blocks = nn.Sequential(
            *[TransformerEncoderBlock(width, heads, attn_mask) for _ in range(layers)]
            )

    def forward(
        self,
        x: torch.Tensor
        ) -> torch.Tensor:
        x = self.token_embedding(x)  # 1. トークン化された文章をベクトル表現に変換
        x = x + self.positional_embedding  # 2. Positional Encodingにより位置情報を付与
        x = x.permute(1, 0, 2)
        x = self.transformer_encoder_blocks(x) # 3+4. TransformerEncoderBlockでの処理をN回くり返す
        x = x.permute(1, 0, 2)
        return x
3. Image Encoderの実装
CLIPのImage EncoderとしてはResNetやVisionTransformerが用いられています。今回はVisionTransformerを用いて実装を行っていきます。 VisionTransformerは上で実装したTransformer Encoderを、自然言語処理ではなく画像分類に適用するためのモデルです。 VisionTransformerでは以下のような順番で画像の処理が行われます。
- 元の画像を分割したもの(=パッチ)を作成し、これをEmbeddingしたものを横に並べる。
- 1で作成したパッチの列の先頭に分類用のclass tokenをEmbeddingしたものを追加する。
- 2で作成したパッチとclass tokenのEmbeddingにPositional Embeddingを足し合わせ、パッチ列中での位置情報を付与する。
- ViTのPositional Encodingでは、学習可能なパラメータを用いている。
- 3の出力をTransformer Encoderに掛ける
- class tokenに相当する部分のEmbeddingをMLPに入力する。
- 5の出力を元にクラス分類を行う。

Image Encoderでは、画像1枚1枚に対して通常のVisionTransformerと同様に1~4の処理を行います。具体的な実装は以下の通りです。
class VisionTransformer(nn.Module):
    def __init__(
        self,
        image_size: int,
        patch_size: int,
        width: int,
        layers: int,
        heads: int,
        output_dim: int
        ) -> None:
        super().__init__()
        image_height, image_width = image_size, image_size
        patch_height, patch_width = patch_size, patch_size
        num_patches = (image_height // patch_height) * (image_width // patch_width)

        self.conv1 = nn.Conv2d(in_channels=3, out_channels=width, kernel_size=patch_size, stride=patch_size)

        self.class_embedding = nn.Parameter(torch.randn(1, 1, width)) # class_tokenのEmbeddingに相当
        self.positional_embedding = nn.Parameter(torch.randn(1, num_patches + 1, width)) # num_pathes + 1 = patch数+class_embedding
        self.layer_norm_pre = nn.LayerNorm(width)

        self.transformer_encoder = nn.Sequential(
            *[TransformerEncoderBlock(width, heads) for _ in range(layers)]
        )
        self.layers = layers

        self.layer_norm_post = nn.LayerNorm(width)
        self.proj = nn.Parameter(torch.randn(width, output_dim))

    def __image_to_patch(
        self,
        x: torch.Tensor
        ) -> torch.Tensor:
        """
            入力画像をパッチに変換する。
        """
        x = self.conv1(x)
        x = x.reshape(x.shape[0], x.shape[1], -1)
        x = x.permute(0, 2, 1)
        return x

    def forward(
        self,
        x: torch.Tensor
        ) -> torch.Tensor:
        x = self.__image_to_patch(x)  # 1. 画像をパッチに変換しEmbeddingする
        x = torch.cat([self.class_embedding.expand(x.shape[0], -1, -1), x], dim=1)  # 2. class tokenのembeddingをパッチの先頭に追加
        x = x + self.positional_embedding.expand(x.shape[0], -1, -1)  # 3. positional encodingで位置情報を追加
        x = self.layer_norm_pre(x)

        x = x.permute(1, 0, 2)
        x = self.transformer_encoder(x)  # 4. パッチのembeddingをTransformerEncoderに入力
        x = x.permute(1, 0, 2)
        return x
4. CLIPの実装
次に、上の1,2で実装したTransformerEncoderやVisionTransformerを用いて、CLIPを実装していきます。
CLIPの実装は以下のようになります。
class CLIP(nn.Module):
    def __init__(
        self,
        image_size: int = 224,
        patch_size: int = 32,
        width: int = 768,
        layers: int = 12,
        heads: int = 8,
        context_length: int = 77,
        vocab_size: int = 49408,
        output_dim: int = 512,
        ) -> None:
        super().__init__()

        # image encoder
        self.image_encoder = VisionTransformer(
            image_size = image_size,
            patch_size = patch_size,
            width = width,
            layers = layers,
            heads = heads,
            output_dim = output_dim
            )
        self.image_projection = nn.Parameter(torch.randn(width, output_dim))

        # text encoder
        self.context_length = context_length
        self.text_encoder = TransformerEncoder(
            context_length = context_length,
            vocab_size = vocab_size,
            width = width,
            layers = layers,
            heads = heads,
        )
        self.text_projection = nn.Parameter(torch.randn(width, output_dim))

        self.temperature_parameter = nn.Parameter(torch.ones([]) * np.log(1 / 0.07))

    def encode_image(self, images: torch.Tensor):
        """
            Image Encoderを用いて画像をImage Embeddingに変換
        """
        x = self.image_encoder(images)
        x = x[:, 0, :]
        x = x @ self.image_projection
        return x

    def encode_text(self, texts: Tuple[str]):
        """
            Text Encoderを用いてテキストをText Embeddingに変換
        """
        tokens = self.__tokenize(texts)
        x = self.text_encoder(tokens)
        # print(x)
        x = x[torch.arange(x.shape[0]), np.argmax(tokens, axis=1)] # EOT tokenのembeddingのみ使用する
        # print(x[0])
        x = x @ self.text_projection
        return x

    def __tokenize(self, texts: List[str], truncate: bool = False):
        """
            byte-pair Encodingの手法を用いて、テキストをtokenに変換する。
            byte-pair Encodingの詳細は本記事では省略する。
        """
        _tokenizer = _Tokenizer()
        sot_token = _tokenizer.encoder["<|startoftext|>"]
        eot_token = _tokenizer.encoder["<|endoftext|>"]
        all_tokens = [[sot_token] + _tokenizer.encode(text) + [eot_token] for text in list(texts)]
        result = torch.zeros(len(all_tokens), context_length, dtype=torch.int)
        for i, tokens in enumerate(all_tokens):
            if len(tokens) > context_length:
                if truncate:
                    tokens = tokens[:context_length]
                    tokens[-1] = eot_token
                else:
                    raise RuntimeError(f"Input {texts[i]} is too long for context length {context_length}")
            result[i, :len(tokens)] = torch.tensor(tokens)
        return result

    def __l2_normalization(self, x: torch.Tensor):
        """ L2正規化を行うメソッド """
        x_l2_norm = torch.sum(x**2, dim=1)**0.5
        x_l2_norm = x_l2_norm.unsqueeze(1).expand(64, 512)
        return x / x_l2_norm

    def forward(self, images, texts):
        """
            logitsを計算する。
        """
        # L2 Normalization
        image_embeddings = self.__l2_normalization(self.encode_image(images))
        text_embeddings = self.__l2_normalization(self.encode_text(texts))

        # logitsを計算
        logits_per_image = (image_embeddings @ text_embeddings.T) * self.temperature_parameter.exp()
        logits_per_text = (text_embeddings @ image_embeddings.T) * self.temperature_parameter.exp()

        return logits_per_image, logits_per_text
encode_imageでは、VisionTransformerのTransformerEncoderの最終出力のうち、class_token、すなわちindex==0の位置にあるEmbeddingを取り出します。その後、image_projectionにより512次元のベクトルに変換し、最終的なCLIPの画像特徴量とします。
また、encode_textでは、TransformerEncoderの最終出力のうち、EOT(End Of Text)、すなわち最も大きいtokenの値を持つindexにあるEmbeddingを取り出します。その後、text_projectionにより512次元のベクトルに変換し、最終的なCLIPの文章特徴量とします。
forwardでは、与えられた画像とテキストの入力をエンコードし、logitsを計算します。具体的には以下のような順番で処理を行っています。
1. encode_imageやencode_textを用いて画像やテキストをCLIPのEmbeddingに変換
2. 1で変換したEmbeddingをL2正規化
- L2正規化についてはこちらの記事を参照
3. 画像とテキストのCLIP特徴量の行列積を計算することで、画像/テキスト毎のlogitsを取得
4. Symmetric Lossの実装
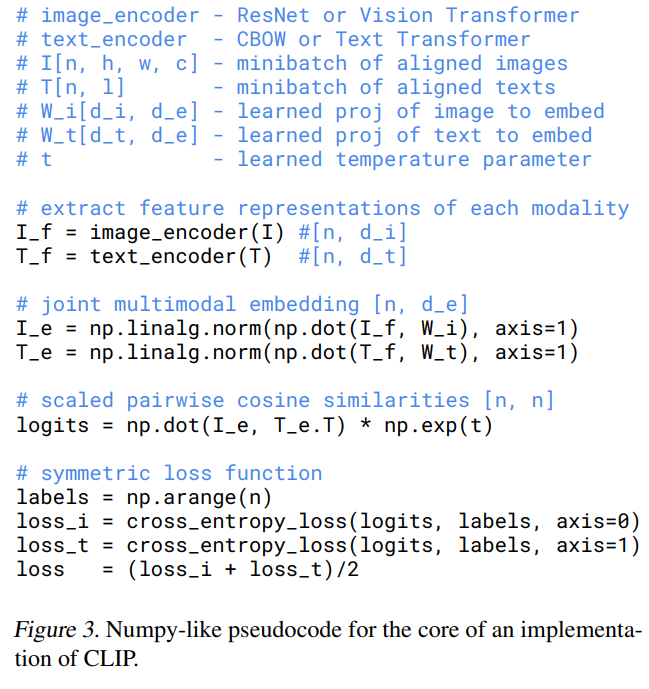
CLIPでは対照学習を行っています。具体的には、1バッチ内の画像とテキストについて、元々のペアを正例、それ以外のペアを負例とすると、学習時には正例との類似度が高く、負例との類似度が低くなるように学習を行います。 論文中では以下のような疑似コードが掲載されていました。この疑似コードに関してはこちらの記事で詳しく解説されています。
また、この疑似コードを元にSymmetric Lossの実装を行ってみました。
class SymmetricLoss(nn.Module):
    def __init__(self):
        super().__init__()
        self.criterion = nn.CrossEntropyLoss()
        self.device = "cuda" if torch.cuda.is_available() else "cpu"

    def forward(self, logits_per_image, logits_per_text, labels):
        labels = labels.to(self.device)
        loss_i = self.criterion(logits_per_image, labels) # 画像に対するloss
        loss_t = self.criterion(logits_per_text, labels) # テキストに対するloss
        loss = (loss_i + loss_t) / 2
        return loss
感想
初めての記事執筆でした。読みにくい箇所もあるかと思いますがご容赦下さい。
普段からCLIPに関してはOpenAIが提供している事前学習済みモデルを使用しているのですが、自分で実装しながら記事を書いてみると、TransformerやViT、CLIPへの理解がより深まりました。
参考文献
- 前の記事 : ZapLineを用いたLFPに対する電源由来のアーティファクト除去 (Python)
- 次の記事 : 英語のカルテデータのコンペに参加してみた(際の失敗と反省)
- 関連記事 :
